
Are you afraid of letting AI write code for financial trading? Common fears include “Infinite loops draining API quotas,” “Accidental buy orders during testing,” or the AI simply “forgetting context” halfway through.
Today, I will show you how to use the Antigravity Rule Generator to completely eliminate these risks. We will set up a “US Market Pulse Dashboard” project in under 5 minutes using a professional “Fortress Architecture.”
Step 1. Design the Project (Input)
First, we need to give the AI a clear blueprint. Access the generator and input the project details to ensure the AI selects the correct technology stack.
- Go to: https://vibealgolab.com/agent-rule-generator/
- Fill in the fields: Copy and paste the following details into the generator.
- Project Name:
US Market Pulse - Project Goal:
Analyze real-time US stock market trends and visualize sector performance via an interactive dashboard. - Key Features:
- Real-time S&P 500 & Nasdaq 100 data tracking
- Sector heatmap visualization (Technology, Finance, Energy, etc.)
- Technical Indicator calculation (RSI, MACD, Moving Averages)
- Interactive charts with zoom/pan capabilities
- Tech Stack:
Streamlit, yfinance, Plotly, Pandas, TA-Lib
- Generate: Click the [⚡ Generate Antigravity Rules] button at the bottom.
Step 2. Build the “Fortress” (Folder Setup)
Clicking the button will generate 4 core rule files (Frontend, Backend, Workflow, Memory). Now, you must set up your folder structure exactly as required for the AI to recognize them.
⚠️ This is the most critical step. Please follow this folder structure precisely.
- Create Root Folder: Create a new folder on your computer named
US_Market_Pulse. - Create Agent Folder: Inside that folder, create a subfolder named
agent. (This is where the AI’s “Constitution” lives). - Save Files: Copy the content of the 4 files generated on the website and save them into the
agentfolder.
📂 Your final structure must look like this:
Plaintext
US_Market_Pulse/         <-- (Project Root)
├── agent/               <-- (★ MUST CREATE THIS!)
│   ├── Frontend_Rules.md
│   ├── Backend_Rules.md
│   ├── Workflow_Rules.md
│   └── AI_MEMORY.md
└── (Your future code...)
Note: Please ensure the filenames (e.g.,
Frontend_Rules.md) match exactly as shown on the website.
Step 3. Get the Boot Command
Simply saving the files is not enough. You must “wake up” your AI agent (Cursor, Windsurf, etc.) and order it to “Obey these rules from now on.”
This process is called the System Boot.
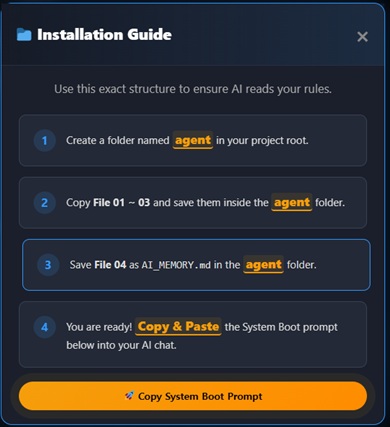
- On the result page of the generator, look for the [📚 How to Install] button at the bottom and click it.
- An ‘Installation Guide’ popup will appear.
- Click the orange button at the very bottom labeled [🚀 Copy System Boot Prompt].
(This copies a special command to your clipboard that initializes the AI in “Safe Mode”.)
Step 4. Launch the Agent
Now, open your preferred AI Code Editor (Cursor, Windsurf, Trae, etc.).
- Open Folder: Open the
US_Market_Pulsefolder in your editor. - Open Chat: Open the AI Chat panel (usually
Cmd+LorCtrl+L). - Paste & Enter: Paste (Ctrl+V) the “System Boot Prompt” you just copied and hit Enter.
🎉 What Happens Next?
The moment you hit Enter, your AI transforms from a simple chatbot into a Technical Project Manager (TPM).
- Rule Verification: It will confirm that all rule files are loaded.
- Simulation Mode: It will announce that it is in “Simulation Mode” (Cost: $0).
- Safety Check: It will guarantee that no real API calls will be made without permission.
- Roadmap: Instead of writing code blindly, it will ask: “Shall we define the development roadmap based on Workflow_Rules?”
Now you are ready. Enjoy Vibe Coding safely with Antigravity! 🚀